HOW TO FIND AWESOME LIGHTING FOR PHOTOS IN 3 EASY STEPS
Want to know the secret to taking great photos? ...........GREAT LIGHTING.When looking for a place to take a picture, I first look for good lighting. Second, I find an esthetic background. Lastly, I look for a place to pose my subject. So lighting always comes first. You might ask, why all this emphasis on lighting? Well, lighting is a key factor in creating a successful image because it is necessary to control and manipulate light correctly in order to get the best texture, vibrancy of color, and luminosity on your subject. Whether you're taking pictures of your cappuccino for Instagram, snapping photos on a family vacation, or are studying the essentials of photography for a class project, never underestimate the importance of lighting in photography. Here I will teach you 3 easy steps to finding 'good' lighting for taking pictures.
1. Best lighting times are sunrise and sunset.
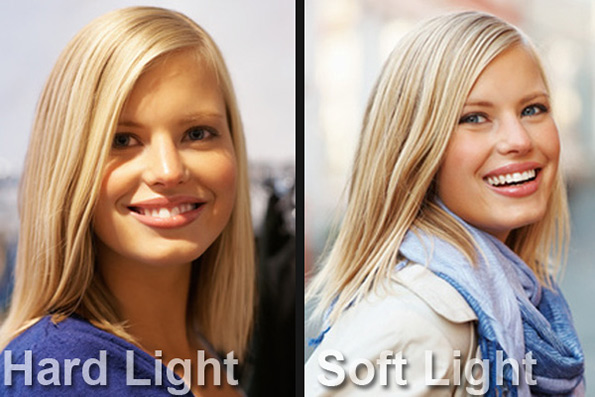
If you are taking photos of someone or something and you have control over the time that you are going to schedule the shoot, pick either sunrise, or sunset. During these times, the sun is lowest in the sky. This creates softer lighting without the harsh shadows that you see mid-day. For portrait sessions, I always book them right at sunrise time, or an hour before sunset. This gives me what's known as the 'golden hour', the hour when the lighting is prime. You can easily find out sunrise/sunset times by Googling the date, location, sunrise/sunset. The website www.timeanddate.com will even give you a chart with every date for the year. After the official sunset time you will have about 5-10 minutes when the sky will be the most colorful (on a clear sky night that is).NOTE: On an overcast day, the lighting will be soft throughout the day and you can do your shoot anytime. Mid-day would be actually be ideal for overcast because you will have the most light at that time. Notice in the above photos that the left one has shadows across her face, and highlights on her chin, cheek, tooth, and nose? The right photo has even lighting across her whole face and her eyes have a catchlight in them rather than being dark and shadowed.
2. In mid-day, look for solid shade.
Maybe you don't have control over when to schedule your photo shoot. If you are sightseeing while on vacation, chances are that the times that excursions, tours, and museums are open will be mid-day. That's ok, you can still find good lighting even at high noon. The key here, is to find solid shade. Look at the ground. If there are sunspots where you are standing, that would be considered an area of speckled light - no good! Walk to an area (possibly in the shadow of a nearby building or full tree coverage) to find solid shade. Another trick, if your subject is something small (like a food item), you might use your hand or a piece of paper to block the sun and cast a shadow on the subject. If you are taking a photo of a person, you could even use another person's shadow standing a few feet away to block the sun, depending on the angle. This area has solid shade because of the shadow from the building and the blockage of the flower bush. Notice the ground has no light speckles on it? That's how you know this was a solid shade spot.
  The above photo of Cappuccino has even lighting across the entire surface.
3. In bright sunlight, have the sun at your back. If shooting into the sun, use flash.
This one is a bit tricky, but nonetheless, with a little practice you can master it! If you are using a cell phone camera, or a camera without a strong flash, you will want to keep the sun at your back for natural ambient lighting on your subject. The color will be the most vibrant, and your photo will turn out crisp and clear with good natural lighting. See example below. If you are trying to capture a sunset, or something in the direction of direct sun, you will need to use a powerful flash to compensate for the backlighting.
- Move your subject directly in front of the sun/light source to block it so that your camera will be able to focus on the subject without hinderance from lens flare.
- Set your manual camera settings to expose for the background. If a sunset, you would want the background a tad underexposed so that the colors appear more vibrant. Take a test shot to see if the background is the exposure you are wanting. (See below NOTE for program users).
- Turn your flash on, aim straight at your subject and adjust the power up or down to get proper exposure for the subject.
**NOTE: If you are unfamiliar with manual settings, one way to know what settings to use for step 2, would be to set it on program first, aim at just the background without the subject, and see what program settings your camera has chosen for you. This is how the below photo was captured. I hope this information helps you all to capture the moments of life in a beautiful way!xo Mel
Want more photo skills?
Join the WALKING PHOTOGRAPHY WORKSHOP led by Melissa in downtown Charleston to learn how to have a better eye for photography.

